POUR ON TABLE TOP AND BAR TOP CLEAR EPOXY
PROGRESSIVE EPOXY POLYMERS, INC.
Pittsfield NH 03263
** Quick EMAIL / ph 603.435.7199 EST / Google SITE SEARCH / Buy On-line TWO STORES / Goto Contact PAGE / Web Product CATALOG / Progressive Epoxy HOMEPAGE / View our VIDEO / Navigation Bar REPLACEMENT / Data and MSDS PRODUCT INFO / Epoxy Guru HELP SITE / Top Selling Products - FAVORITES * *
This product is featured on the GreatThings4u.com website
NO SALES TAX - You are shopping in TAX FREE New Hampshire
Doing a Epoxy Penny Floor? It is similar in some ways. Visit our Penny Floor page instead of this web site
MEMBER: Internet Epoxy Confederation (IEC - CLICK HERE TO VISIT) -- "Where Professionalism Still Matters"
Notes/feedback:
1) have had no reports of problems covering new photographs, but customer coating an old photo reported it turned red/orange when contacted with the epoxy. No reports of printed materials having problems with the inks running due to the epoxy except for some very cheap crape paper type party decorations.
2) Customer glued down coins with a drop of hot glue. The space around the drop of hot glue on the bottom of the coin is filled with air and when the epoxy was poured a ring of bubbles appeared around the edge of the coin.
3) After 20 or 30 minutes past the time you pour do not attempt to pop bubbles with a torch or do other things. The epoxy is well on its way to setting up and disturbing it can results in 'ridges', ripples, etc.
As a professional woodworker, I was recently contracted to make a 14 foot curling table for a customer. After doing
some research, I came across your Bio-Clear 810 epoxy product and chose it for the price and the eccentric web
site. I figured that such a "different" web site MUST be offset by a truly quality product.
I was right!
This was the first time I had ever attempted an epoxy pour, so after some practice and reading the provided literature,
I figured out the technique for pouring a 14 foot x 22" top.
My customer was delighted with the product and I hope to sell many more of these curling tables in the United States.
Thanks guys !
John P Rose (10/06)
330-416-8207
https://customfurniturecreations.com
Bio Clear 810 resin (part A) is quick to crystallize and turn milky (sometimes within a month of manufacture). Warming the resin at about 100 degrees overnight (or in a microwave for about 15 minutes) will fix it and make it clear again. See our page on crystallization of epoxies. www.epoxyproducts.com/crystal.html
You're talking with: Paul Oman, MS, MBA -- Member since 1994: NACE (National Assoc. of Corrosion Engineers), SSPC (Soc. of Protective Coatings) -- Technical Help - not sales talk!
"If you have knowledge, let others light their candles in it." -- Margaret Fuller, Journalist
SANDING THE BIO CLEAR 810 AND MAKING A 'PERFECT SURFACE'
I used a palm sander with 60 grit initially and worked my way up to 400. I then used an electric buffer with plastic
polish, they sell it in fine medium and coarse and you work your way up like sandpaper. I finished off with Meguiars
plasticX.
As for the polyurethane it was Minwax brand and high gloss. I applied it with a foam roller initially and smoothed
out the bubbles with a wide brush. I used the roller to put the polyurethane down in a hurry so it would be wet
still and level out smoother. I was told after the second coat to use a lambs wool pad like they use for hard wood
floors and I did with pretty good results. The only way it would have looked better was if it was done in a completely
dust free environment. The finish is quite clear and any scratches that occur now I just use the PlasticX with
the buffer.
The wood blocks were pine I assume and they bubbled like crazy. Tiny bubbles and hundreds of them. Polyurethane
any wood beforehand and be safe. (see picture at
www.epoxyproducts.com/bartop.html)
Thanks again
James
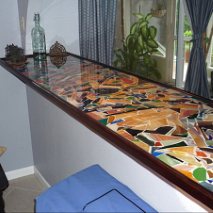
Table top:
Hi Paul,
To start we glued black formica to the counter top 3/4" plywood base and built a 5/16" plywood strip
dam around it. The release agent was waxed paper and was placed between the dam and the plywood countertop base
then run up and over the dam. Everything was taped in place to include the bottom seam between the dam and the
base. The dam was attached with screws and was pretty tight. This was done on a boat so we had to level the whole
thing. We placed glass flat stones, which were a uniform 3/8" in height, all over the formica and poured the
Bio Clear to the top of the dam. My wife wanted a little relief with the top of the stones showing so we poured
until we got the effect she wanted. We found we needed an aluminum yard stick to spread the resin over the top
of the rocks because the resin tended to flow up the rocks but not all of the way over them. The Bio Clear flowed
out nicely with no trapped bubbles or any other problems. The few bubbles we had were very small and worked
their
own way out. I think a nice steady slow pour was also one of the reasons we didn't get many bubbles. The room temperature
was a consistent 72 degrees. We ended up using less than the gallon of Bio Clear - probably about three quarts.
The counter top is 8' by 22". Frankly we were amazed and surprised that the project turned out so well. I
think the key to our success was following the very complete instructions and tips on your website and taking our
time to make sure everything was set up correctly.
As I remember you already do this but put a lot of emphasis on following the instructions exactly, reading all
of the information on your website and to taking the time to preparing everything very carefully.
When the bathroom is finished I'll send you some photos.
Thanks again and best regards,
Notes from Progressive Epoxy Polymers (the sellers)
just a few additional (or repeat) comments.
1) mix well but don't try to get every last drop of the mix product. What collects in the bottom of the mix pail
after sitting empty for several minutes is epoxy from the sides, bottom and bottom/side edge. This is not well
mixed and don't use it.
2) if the part A is cloudy or milky it has crystallized a bit. Heat to about 100 or 110 degrees overnight, (say
in a box or cabinet with a light bulb) or in a microwave (for about 15 minutes). It will turn clear again and is
ready for use. Crystallization is common in clear epoxy resins.
3) Nearly all of our customers are first time users and, excluding a drip or two, a few bubbles, etc. the epoxy
pours pretty much go well for everyone. When folks have problems, those problems come back to us so products that
have a lot of issues are just too much of a headache for us to sell. While we sell a lot of the Bio Clear 810,
it is not a 'problem product'. The point I am trying to make is that people usually get the results they want or
expect (or can live with!).
4) Keep some unmixed epoxy aside to repair/fix anything that goes wrong. For example you might drill out an air
bubble and then fill the hole with more 810.
5) some folks 'test' their surfaces for leaks and level-ness with water before using the 810. Then drain water
and let dry before using the 810. Better to find the leaks etc. with 'cheap' water first!
6) the end result is sort of a clear medium hard plastic. It can be sanded and drilled and shaped. Then polished
back to smooth (maybe clear) with fine sandpaper/grit (sorry I don't know if we are talking 1000 grit stuff etc.
- haven't done it but others have). You can also remove 'cloudy sanding scratches' with a thin clear coat of any
kind of clear coating (I have people 'test' this with clear nail polish' over a cloudy scratched surface).
7) one of our semi pro customers likes to do a final thin topcoat instead of the entire thickness in one pour.
He says it gives a smoother surface. We assume to at that point bubbles and other issues are 'fixed' in the previous
pours. That said, I think most folks just do a single pour.
8) you can pour the next layer as soon as the first layer is semi-sold and the temperature of the first pour is
back to room temperature. This is probably just a few hours later.
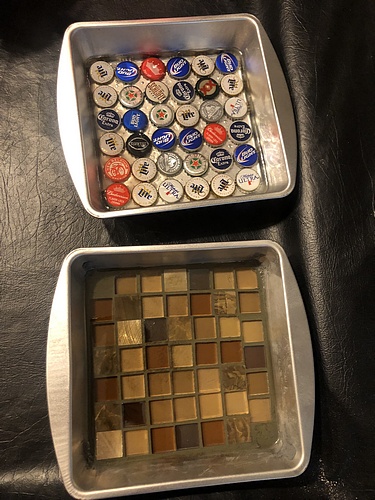
Victoria (3/2019) wrote:
Paul: Just sent some pics. I sealed the tile and
grout with a satin polyurethane. I filled the bottle caps with clay and used a
hot glue gun with clear glue. Had to look for it. I tried a couple of others
including superglue type stuff and the glue gun worked best. I did a water test
to find leaks (found one) and to measure how much I needed. I did make sure to
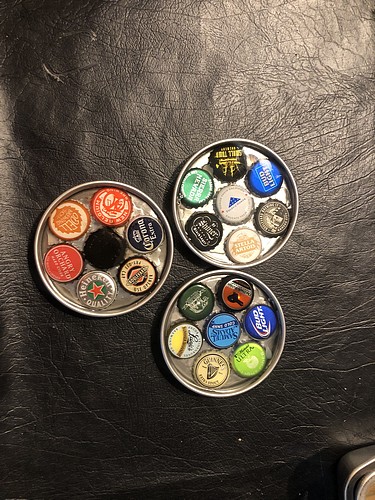
do experimental pours. I also found some tins for candle covers that I put caps
into and used for my experimental pour. Now I have coasters to match my bar top.
I’ll send pics of a couple of those too. Oh one last tip. If you get the flame
too close while warming the air above the epoxy gets to hot and catches fire.
That was fun! Glad it was in my trial. I found 4-5 inches away was perfect for
my needs.
3 of my coasters (I did 6) and my testers in cake pans . Found the cake pans at
Walmart for $0.98 each!
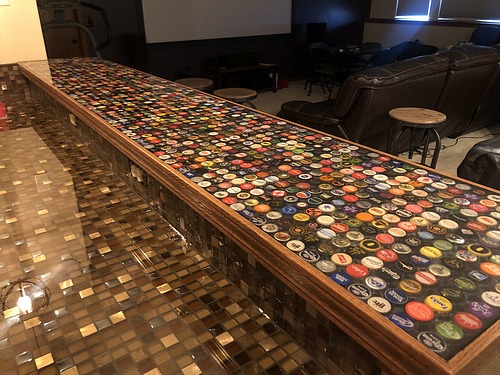
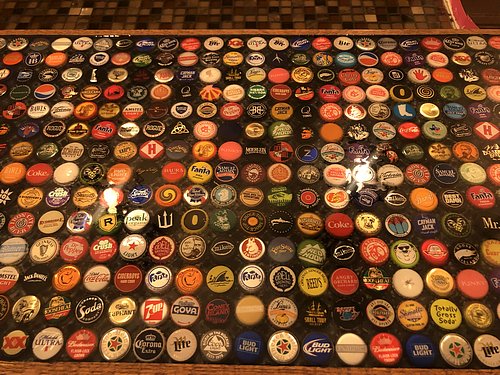
I usually don't advise using a hot glue gun. I had a professional 810 epoxy pour guy hot glue down 3000 pennies on a table top. The hot glue raised the pennies up a little bit and did not extend to the edge of the pennies. When the epoxy was poured over the pennies a ring of bubbles come out from around every penny. Not good!
Paul (10/07) wrote:
For those of you who didn't know, a major project of mine, with a lot of help from my friends, this summer has
been to build a coffee table from scratch with the table top being old cigar box tops. Most of these tops came
from cigar boxes I had saved from way back when, when I was smoking cigars. The idea was to build a table, lay
out the box tops and then put a top over it of epoxy. I'm quite certain I made every possible mistake, but it was
all in practice runs. This is the table finished and in my living room. It looks fantastic.
Regarding advise for others who are interested in doing a project like this
1. Read all instructions.
2. Re-read all instructions.
3. Follow all instructions.
4. Be absolutely certain you use parts A and B in the correct amounts.
5. The mix is critical. Do everything you can to mix thoroughly, but do not mix too fast. These bubbles are hard to heat out after the pour.
6. The set time is for real. Don t dawdle.
AN OFFER YOU SHOULD NOT REFUSE
Before you buy anything from anyone, we HIGHLY SUGGEST you CALL 603-435-7199 OR EMAIL US (24/7/365 - except for Sunday morning church fellowship). Let's make sure you have the right products for the job, an understanding of how to use them and a feel for what might go wrong.
This is really important if you have never poured an epoxy table top. Each project is unique. Bubbles, levelness, leaks, sealing surfaces, edges, etc. Talk to us before you pour.
And if you purchase our products feel free to CALL OR EMAIL US again (24/7/365) before you use them for "tips and tricks" or just some "hand-holding." Perhaps when you're done you'll let us put up some of our pictures on our web site.
We have much more information, customer stories, anecdotes, etc. we can share that are not on this web page but might be helpful to you. Email us with your phone # (or call us direct) and we will chat on the phone. You should know your vendor and we want to know our customers.
DIRECT EMAIL LINK (CLICK HERE)
Most people are not sure what product or products they need to use, how much product they need, and what to expect when using those product(s). You cannot get that from just reading a web site and most web sites just want you to order their product on-line and then go away. We're different. Please call or email us so that your project goes smoothly and it is Win-Win for everyone.
You're talking with: Paul Oman, MS, MBA -- Member since 1994: NACE (National Assoc. of Corrosion Engineers), SSPC (Soc. of Protective Coatings) -- Technical Help - not sales talk!
A recent customer pointed out that when coating over newspaper text in a bar that the epoxy (as would any similar coat coating) turned the paper 'clear' and the printing on the back of the page clearly showed thru on-top/overlaying the text on the front of the page. Result - a non readable garble of 'ink'.
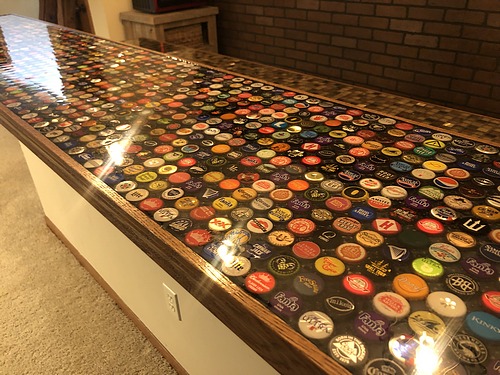
10/12/2011
Made the time to finish the bar top. Used Bio Clear 810 and as far as
we're concerned, it came out great. I did read the instructions and what to watch for.
As you can see from the pics, there is wood trim all around. It was secured with fasteners and an adhesive epoxy.
I then put tape around the bottom seam just in case. What I should have done was put water on the table to check
for leaks (like the instructions say). Oh Well. I was able to keep up with the drips right through the painters
tape for the few areas that leaked. Enough was wasted causing me to have to buy another kit, but the final product
is just what we were looking for. A friend of ours makes glass stuff and she gave us boxes of scraps. The arrangements
are less than random, but varied enough to find numerous patterns. I used a hair dryer to get rid of some stubborn
bubbles. There you have it.
Thanks and please enjoy the pics. Best Regards,
RETURN TO THE BIO CLEAR 810 / BAR TOP PRIMARY PAGE CLICK .
BIO
CLEAR 810 POUR ON TABLE TOP BAR TOP EPOXY USER REVIEWS COMMENTS
Bio Clear 810 and Acrylic Poly UV Plus
Josie Lewis (5/2010) wrote:
Hello: I've read your site with interest. I am an artist using a 2 part clear coat resin, marketed as a tabletop
resin. Currently I use EX-74 from Envirotex which claims to have a UV blocker, but in a recent UV test did not
perform any better than the cheaper stuff. I make wall pieces that have several layers of resin and average about
an inch thick. My work is designed for indoor display and I tell my buyers to keep the pieces out of direct sunlight
(which is always desirable for artwork).
I am becoming deeply concerned about the yellowing potential, as you can imagine. It seems from your website you indicate that some kind of a protective topcoat can be helpful (the Acrylic Poly UV plus?). What would you recommend to have most UV resistance possible for my particular application?
Josie Lewis (6/2010) wrote:
Hi Paul: I recently purchased BioClear and Acrylic Poly UV Plus from your company. I have access to a UV chamber
which simulates high altitude direct UV exposure. I thought you might be interested in my findings. I used a Masonite
panel painted white and then coated with BioClear. On half of the BioClear coated panel, I brushed on one coat
of UV Poly and put it in the chamber for 644 hours at 50 C (the heat accelerates the exposure). Attached is a picture
of the results. The masonite cracked a bit and separated due to a bit of wetness in the wood (unrelated to the
resin). The BioClear ambered dramatically within about 50 hours. After 644 hours, the UV Poly showed a slight bit
of ambering from the original control but it is marginal at worst. The technician who ran the test said if it isn't
yellow at 644 hours it is basically indestructible. I also tested several other 2-part resin products with the
UV Poly and had the same result. You have a great product. I now feel secure knowing that my resin art, protected
with the Poly UV Plus, will be archival and protected for long years. I will be ordering more soon!
Best, Josie (6/2010)
VENDOR COMMENTS:
The original 2 part poly clear we sold was like everyone else's - essentially no UV protection. I got the factory
to reformulate using max UV blockers and UV absorbers (there is a difference). Raw material costs went up almost
$10 a gallon (guess that is why other folks don't add them). You cannot put UV blockers into epoxy resin systems
- it is a chemistry thing.
My sun exposure tests are just trays in the parking lot. I seem to have similar results. I have found for the UV
poly (and with other coatings for sealing and waterproofing) two coats, not one, make a huge difference. Suspect
you would be even more impressed with 2 coats of the UV poly.
As far as the epoxy goes, the 810 yellows less (or at least much slower) than most or all of the other epoxies.
Also, all epoxies take 5-10 days for full cure. Suspect you would find different amounts of yellowing if you had
begun your testing with 2 day old 810 epoxy and 2 week old 810 epoxy.
Josie Lewis (6/2010) wrote:
Paul: I'm totally fine with you using my comments! I hope it helps someone. As to your questions about final surface,
I definitely have problems with that. Below is my routine for getting a really nice surface (it ain't easy). I
have a spray booth, but I have problems getting little flecks of stuff in the resin/poly no matter what precautions
I take. (VENDOR COMMENTS: HAVE HAD REPORTS OF THAT HAPPENING MINUTES AFTER ROLLING OR BRUSHING - SUSPECT DUST IN
THE AIR) The resin is easier than the poly, which you are right in saying is super tricky. Because I am very concerned
about yellowing, I've figured out a way to make the poly work...
Multiple coats of two part resin (eventually 1-4 inches thick) (this is The Art) (see www.josielewis.com)
After final coat of resin, I allow the resin to cure for a couple of weeks
I rough up the surface with 100 grit paper
I brush on two thick coats of Poly UV (thin, multiple coats were cracking. You mentioned earlier you thought thin
coats would be harder. I haven't noticed any differencE)
I let that rest for a week or so
I sand down the Poly UV with 1000 grit paper (or slightly rougher if there's dirt/hair, etc)
Then I spray it with a auto clear coat (from a can, I don't have professional spray equipment)
THEN, I sand it progressively with 600-1000 grit, then buff it with a professional random orbital buffer with a
cutting compound and then a polishing compound. I basically do the same thing that they will do with a car to get
it nice and shiny. (BTW I use a spray booth for the wet work, and my garage for the sanding, and I wear a OSHA
ventilation mask for everything--got to be careful with this stuff.
VENDOR COMMENTS:
The Acrylic Poly UV Plus is very high solvent, (like auto clear coat). It works best with multi thin coats. Thick
applications will result in solvent trapping below the surface - keeping it
soft'. That said, it is a soft coating. It likes to go over non-porous surfaces, typically a new/fresh epoxy base coat.
NEED MORE TWO PART EPOXY HELP???

|
PARTIAL DATA SHEET |
BIO CLEAR 810 (tm) |
|
Cycloaliphatic Crystal Clear Slow, Gentle Cure Cures to Wet or Damp Surfaces
|
Solvent-Free Easy 2:1Mixing Ratio (1:.43 by weight) Approx. 20% Elongation VOC Class: Mastic VOC = 0
|
|
STANDARD PRODUCT DESCRIPTION
|
Bio-Clear 810 Epoxy is a 100% solids, low viscosity, clear resin system designed for many applications including damp and wet surfaces. This product is moisture insensitive and has good chemical resistance and physical properties including approximately 20% elongation, slow and gentle exotherm and has a cycloaliphatic curing agent.
Best applied to rough surfaces or as a thick film as product will ‘dimple’, crawl/ creep if brushed or rolled onto smooth surfaces.
|
| USES
|
Sealing Concrete Table Tops
|
| FEATURES
|
Low viscosity Convenient 2 to 1 ratio by volume (1 to .43 by weight) Bonds to damp concrete Self-leveling Solvent-free (no odor)
|
| CURE SCHEDULE
|
POT LIFE@ 70�F ........................ 45 minutes (6 ounce sample) larger amounts will have less time TACK FREE ................................. 8 -12 hours HARD TO TOUCH....................... 24 hours FULLY CURED............................ 5 days
|
| DIRECTIONS |
Surface to be top coated must be clean and free of oils, grease and loose contamination. The epoxy and the surface to be coated should be at a constant 68 degrees or warmer for 24 hours before and after the pour. Do not apply in direct sunlight. Epoxy and application surface should be approximately the same temperature prior to application. This will minimize any effects that temperature may generate during the curing process.
Mix Bio-Clear 810 epoxy base with theBio-Clear 810 curing agent. Part A may have a slightly yellow tint and B should be clear prior to mixing - if not, do not proceed and contact supplier). Mixture will also be clear after mixing. A mechanical mixer will help ensure thorough mixing but if using a mechanical mixer, use a low speed to reduce the generation of air bubbles. Do not mix the epoxy in the same containers that the epoxy came in. Pour the proper ratio of the two components into a large enough container to allow adequate, vigorous mixing without having the epoxy splash out. The mixing ratio is 2/1 (base/curing agent) by volume or 1/0.43 by weight.
Bubbles resulting from the mixing will rise to the surface and most or all will pop. Heat from a torch or hair drier (set on low) will usually pop most remaining bubbles. It is never possible to completely mix all of the epoxy in your mixing container. The epoxy at the corner of the bottom and sides, and on the bottom will probably not be mixed well enough. Therefore, after mixing do not try to get every last drop out of the mixing container (don’t overturn the mixing container and drain it for a long period of time). Bio-Clear 810 does not require a ‘sweat-in’ or induction time and the mixed components should be used immediately.
|
|
S |
|
| FIND COMPLETE DATA SHEET AND MSDS - CLICK HERE | |
Click here for the latest "how to instructions and comments" formatted as a PDF file for easy downloading/printing..
Doing a Epoxy Penny Floor? It is similar in some ways. Visit our Penny Floor page instead of this web site
| PRIMARY PAGE - COVERS ALL EPOXY RESIN TABLE TOP BAR TOP EPOXY OPTIONS | CLICK HERE | |
|
Bio Clear 810 epoxy (1/4 inch
pours - needs edge on all
sides) More info, pictures, comments |
CLICK HERE | |
|
Bio Clear 810 epoxy (1/4 inch
pours - needs edge on all
sides) More info, pictures, comments |
CLICK HERE | |
|
Bio Clear 810 user comments More info, pictures, comments |
CLICK HERE | |
|
Bio Clear 810 user comments More info, pictures, comments |
CLICK HERE | |
|
More Bio Clear 810 user comments (2nd web site) More info, pictures, comments |
CLICK HERE |
Legal Stuff / Returns
NOTICE: Legal notices, Terms of Service, warranty information, disclaimers, health warnings, etc. are required reading before using web site, ordering and/or using Products. Any such use and/or ordering, online or by telephone, shall constitute acceptance and knowledge of all such terms.
CLICK HERE to access these terms. Please note: Whenever you purchase from this web site, and with each new purchase, you are granting us full and complete permission to add you to our email newsletter list at our option. Accessing this web site, and/or purchasing our products, grants Progressive Epoxy Polymers, Inc. permission to add you to our email newsletter list. You may opt out from the newsletter at any time (link to do so can be found on the newsletter).RETURNS: call or email for authorization to return. Returns are subject to a 25% restock fee. Customer pays return shipping and must comply with federal DOT shipping requirement/labeling for hazmat epoxies under penalty of fines and legal action.
** Quick EMAIL / ph 603.435.7199 EST / Google SITE SEARCH / Buy On-line TWO STORES / Goto Contact PAGE / Web Product CATALOG / Progressive Epoxy HOMEPAGE / View our VIDEO / Navigation Bar REPLACEMENT / Data and MSDS PRODUCT INFO / Epoxy Guru HELP SITE / Top Selling Products - FAVORITES * *
"The Right Epoxy fixes Everything!"
Visit our Subject / Catalog contents PAGE